Sunday, August 17, 2014

Back from hibernation


Hey folks!

I haven't touched this blog in ages, but now I'll try to get back to it with quick posts on things I'm working on. 

I just returned to Krillbite Studio after a lengthy vacation, and finally had the lust and dedication to get more acquainted with Zbrush. I've used both Zbrush and Mudbox previously, but I've only dipped into the possibilities these programs have to offer. 

This weekend I went through a tutorial DVD I've bought from Eat3D called "Zbrush 3.5 - A Comprehensive Introduction". It's an introductory tutorial to Zbrush by Michael Pavlovich where you get to learn a lot about the various functions in Zbrush, and you get to create a human head from a box along with the instructor. 

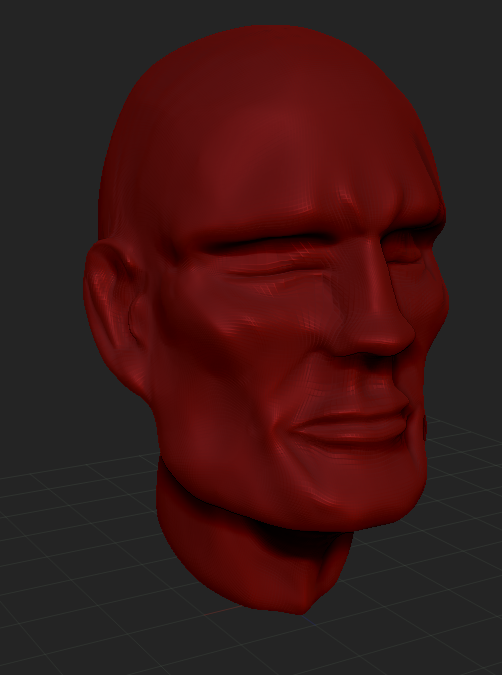
Below you can see the results of this weekend's work. I obviously need to work a lot more on anatomy and sculpt more heads to get something I can be really impressed with myself about, but I'm pleasantly surprised that I managed to get into making something semi-decent after having neglected Zbrush for so long. This particular model took me about 5 hours, but that includes a lot of time watching the instructor and learning about various nifty techniques in Zbrush. 


Saturday, April 20, 2013

Asset workflow

Hey!

As I mentioned in my previous post, I've had very little spare time the last month, with getting ready for Krillbite's Kickstarter and starting in a new part time job. I've been pondering what's important to think about when creating assets for a video game, and I believe a solid workflow is one of, if not the most, important timesavers you can have.
Too many times have I rushed ahead too many steps without consulting with other people, and 9 times out of 10 it results in me having to go back and redo something, taking away both time and morale. Though you have to be ready to redo a lot of work in this kind of work, it never gets any more entertaining to do so. So I thought I'd take you through the workflow of one of the assets I've been working on this last week, to see what I might have done right or wrong!

Most often it starts with the game designer's idea of the level, which gets handed to the concept artists who then brings the idea to life by drawing concepts of it. I say most often, because it happens that other members of the team comes up with ideas or solutions that are brought into the game.
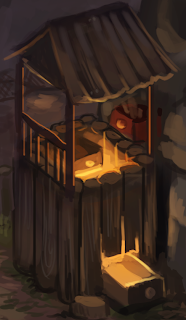
Concept by Tina Alfredsen

In this particular instance, the idea was of a climbing tower where you can use drawers to climb most parts of it. On the left you can see how the first concept of it looked. A mistake I've regrettedly done too many times is to get started right away with making the mesh as soon as I see another concept has been made, without letting people discuss it first. You might feel like you don't want to disturb other people's workflow by asking questions, but communication between the team is really important to avoid mistakes and  misconceptions. Luckily, I had learned from my mistakes this time, so I didn't do any work on it before the concept artists and the game designer discussed the concept art and continued to iterate on it.
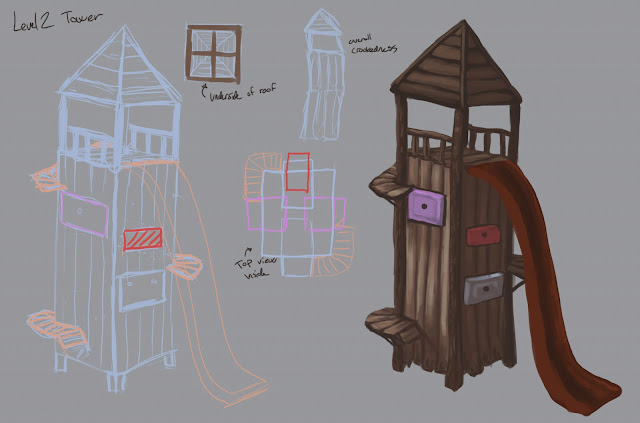


Concept by Karoline Aske
Here you can see the idea of the tower has been more refined, with sketches of how things work, how you traverse it and includes several details like how the underside of the roof is supposed to look, and the 'crookedness' of the tower. With everyone now agreeing on the look of the tower, it's safe for me to start making it in 3D. I also talked with the concept artist, discussing minor details like how it's supposed to look on the inside and things like that.

Now, the most entertaining part (for me at least) of 3D-modelling is the detailing of a model, the prettification if you will. Another mistake I've done too many times is starting directly with adding details that are unnecessary when testing the asset ingame. For the next logical step would be to block it out, or whitebox it. Whiteboxing is a method where you mostly use blocks and simple geometry without any texture, just to see how it works ingame.
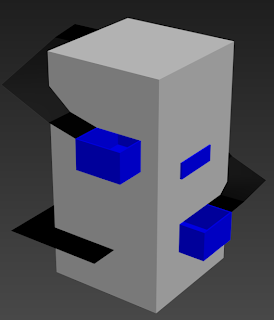

My first version of the tower. As you can see, it only contains the neccessary parts to see if it is traversable. I put it inside the level at this stage, and checked to see if there was room for the player to traverse it without any major issues, and to see if the dimensions of it fit the level. I found major flaws on it very quickly, and was able to fix these as I went along. Had I made a fully detailed tower first, it would have been much harder to go back and fix these issues. Some of the issues were that there were not any room for the player to go upright inside the tower, some of the steps were too steep for the player to traverse, and also the tower felt a little too wide and long in comparison to its height. I had also worked with making the drawers interactable, but after talking with the game designer about this we found that it would be much easier just making them static. The interactable drawers didn't add enough to the gameplay to warrant the extra work needed to get them to feel right.
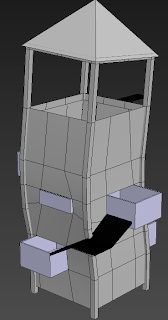

Second iteration of the tower. I've added minor details here like the crookedness, and some supports as well as the roof. This gives a greater insight to how it's final look is going to be ingame. The tower has also been slimmed down, and had some fixes on the inside that's not noticable from this view. It's still mostly simple geometry, so if anyone on the team had noticed any changes that needed to be made, it's still easy to go back and change things at this point. At certain points I like to send screenshots of it to the rest of the art team for input. If they see anything they would like changed, it's easier to change it early in the process rather than when it's finished.
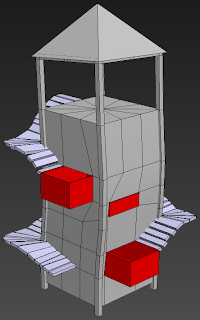

On the third iteration I've added the actual steps you're using to climb the tower. They're quite simple at this point, but gives great insight in how the look of wooden steps looks in 3D. Often we find that things doesn't look as good in 3D as it did in the concept and go for another approach. Again I show it off to either the art team or the game designer to discuss whether it looks good or if we should use another approach.
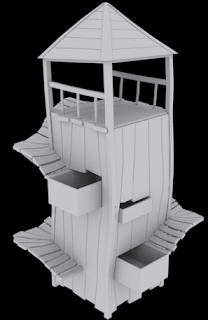

Having received the green light with how it looks, I start on what I consider the fun part, the detailing. Here I've transformed the simple geometry into wooden planks and added things like the fence and supports for the wooden steps. When working this closely on an asset for days it's normal to work yourself blind on it, making it difficult to see what the next logical step would be. Once again I asked the rest of the art team for help and got suggestions to break up the planks, 'destroy' the roof and add more randomness to the wooden steps. A common mistake I've done at this point is starting to unwrap the mesh before discussing with others. This has resulted in me having an unwrapped mesh, before someone coming over and pointing out things I could have done to make it even better. Suddenly I wasted hours on unwrapping something that needs to be redone, that could have been avoided had I just communicated more with the team before doing something.
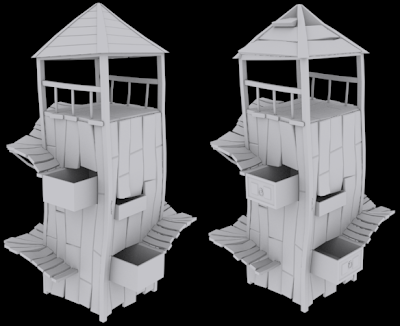

In the final iterations I took the steps that my art members suggested, and it looks much more weathered in the previous iteration, which was the look we were going for.

And there you have it! A run through the workflow that at least works for me in Krillbite. I haven't added the final part of it, texturing, as the asset is actually still a work in progress. The texturing is also made by our 2D artists, so I wouldn't be able to tell you much about their process without a lot of guesswork. The most important message I'm trying to get across is that communication is key. Starting work on something without discussing things that are unclear, or just getting advice on something is a sure way to guarantee that you have to redo your work at some point. I hope this will  help you in the future!

As I've also said earlier in my posts, if you have suggestions to anything I say in my posts, feel free to leave a comment on how and what I could do better and I'll be sure to listen!

As parting words I'll just be so shameless as to remind people that we currently have a Kickstarter going for Krillbite to fund the final stages of development for Among the Sleep. If you would like to see this game completed, it would help us lots if you could share the word!


Game of the moment: Monster Hunter 3 Ultimate

Happy gaming!

-Svein
Thursday, April 18, 2013

Kickstarter going online

Hey!

There have been few posts lately, as we've been working hard at Krillbite towards getting our current project, Among the Sleep, ready for kickstarter. It's now finally online, so feel free to check it out at http://www.kickstarter.com/projects/krillbite/among-the-sleep !

We'll still throw a lot of work into the kickstarter this coming month, but I'll try and get a post up this weekend, talking about some of the work I've done on Among the Sleep since last time. For now I'll get back to celebrating our launch of the kickstarter with the rest of the team!

Happy gaming!

-Svein
Thursday, March 14, 2013

Ambient occlusion tips

Hello again!

I wrote in one of my earlier posts that I'd try to post more often. Well, that failed! We've worked hard towards having something to show off at the upcoming Game Develeopers Conference, so there's been less time to write. In addition to taking up my time though, it's also forced me to work a lot and I picked up a handy tip when baking ambient occlusion maps. For those unfamiliar with the term, the article at http://www.laurenscorijn.com/articles/ambient-occlusion-baking explains everything there is to know.

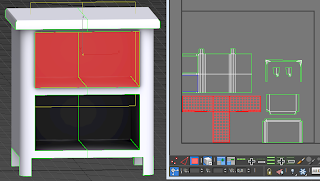
I've read his article a couple of times to figure out the easiest way to bake ambient occlusion maps, but for some reason I skipped the part on overlapped rendering, which is quite important! I've been making a lot of bookshelves and cupboards with drawers lately, and in those occasions you have models with so many similar parts that you want to save UV space by copying the parts over one another. Let's look at this very basic nightstand as an example:


As seen on the picture to the left, I've overlapped the drawers, red, and the insides of the drawerslots on the nightstand, blue. I've also added the ambient occlusion bake I did from this to the texture. At first sight it looks okay, but if we look closer...


It's kind of hard to tell from this picture, but you can just make out some weird lighting at the innermost bottom part. (The black shadows are actually not the Ambient Occlusion's fault, just funky 3D studio shading).


Inside the drawers you can see the lighting artifacts much clearer. The edges get a weird effect from receiving duplicate light information.


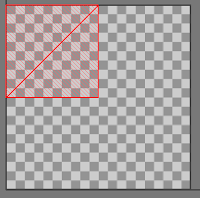
To fix the problem I select the overlapping UVs and toggle the button in the lower left corner of the UV Editor window. This allows you to type relative values in the move fields. (If you try to move the UVs in absolute position mode, you will just squish all the verts into the same position in the axis you moved them in.) I then move the UVs 1 unit in either direction. It doesn't matter what direction you move it, as UVs tile in every direction.

This is how my UVWmap looks after moving the overlapping UVs. You can see that all overlapping UVs now have the same position + 1 unit. This will make them be ignored in the baking process, as they lay outside 0-1 space, but for texturing purposes it would be like they still share UV space.


Here's one of the drawers after the new bake, and you can see that this fixed the problem. Note that I used symmetry for this mesh, and it will work fine when baking, just remember to apply your symmetry before baking, as else light will bleed in from the gaping hole down the middle of your mesh. It's also important to have sufficient padding when using symmetry, to avoid lighting errors where the symmetry is applied.


Hope this helps out, and don't be afraid to ask questions if anything is unclear!

Games of the moment: Sim City and Heart of the Swarm!

Happy gaming!

-Svein


Friday, February 1, 2013

The chandelier

Hey,

tonight I want to show off an asset from Among the Sleep to talk more about symmetry.                            

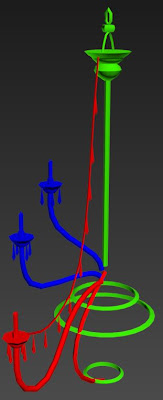
For a lot of people this chandelier will probably look like a complete mess, and they might not even know where to begin should they get the task of making it. The process of making it was a lot easier than it seems though, with the use of the wonderful symmetry modifier. As you probably noticed, a lot of the parts are reused excessively. To make it clear, I drew up a quick picture.

The colored parts in the picture are the only parts I needed to make manually (Except the cage on the bottom, and the hangings on top). In addition, these parts are easily made by using splines or simple geometry. The rest of the mesh is made by copying around/using symmetry. There is one thing that's important to remember though, and that's the UVs.You can save a lot of time and hassle by doing the following.


After making the parts I need, I unwrap them before copying them around and going wild with the symmetry modifier. This makes it so that the UVs are also copied around when I get to that part. Note that I only have one candle and crystal as well.
I like to combine these into one mesh as I unwrap them, as it's easier to work with them and fit them into the UV space. (If you want unique texture for every part of a mesh like this, it's not neccessary to pack the UVs neatly before copying the parts around. You just need to add another unwrap modifier on top and pack all the parts in the end. You could get away with some parts still being copies, but that's up to you and how much uniqueness you want.)


Here I've put together the parts I need, and color coded them. The green parts need no symmetry (I could always have used symmetry on the green circles as well, if I really wanted to save UV space, but it's no big deal). The blue and red parts are split up because the red parts are repeated more times around than the blue parts. (There are 16 of the red parts around, while only 8 blue).
After copying the parts around, the only thing that's left to do is attach them all together and you have a chandelier! At this point you can add another unwrap modifier if you want to make the parts have unique textures, but that should be pretty self-explanatory.


I can not stress enough how much time symmetry tool saves me, and there are a -lot- of objects in the world that are symmetrical, so use it whenever you can. Even if you don't want your mesh to be totally symmetrical, you often save time by first making it symmetrical, and then applying the asymmetrical changes you want afterwards. One thing you might want to have in the back of your head though, especially for meshes like the chandelier where you use symmetry this excessively, is the poly count. When you copy one part around 16 times, the poly count rises dramatically. If you just keep in mind that the polycount of your object will be multiplied with the amount of times you use symmetry, you should be good!

Game of the moment: Battlefield 1942 (Get it for free for some nostalgic fun!)

Happy gaming!

-Svein

Saturday, January 26, 2013

Modular Assets II

Hello again!

In my last post I promised to write about specific modeling techniques I've picked up on while modelling modular assets, so here go! I'd also like to remind everyone that I'm in no way a veteran in the business, so if you see any improvements I can make, or just plain out things I do wrong, please let me know in the comments!

Corner assets

Symmetry

When making a corner you can always use symmetry on your mesh, unless it needs to look different on one side, is broken or stuff like that. But even if one part is broken, you could always just use symmetry first, and then break it afterwards, to save you some time. 

Let's do an example:
To the left we have a regular straight wall. We want to make a corner asset out of it, so we use symmetry. 
To the right, we've used a simple symmetry modifier, with the symmetry mirror turned 45 degrees. It works pretty good, but there are some problems we need to solve. 


When using a symmetry modifier where you turn the mirror, you will encounter parts of the mesh that are now stitched together, which were previously not. To the right we see two beams having been stitched together through the plane of the symmetry modifier. This is bad, as the 5 vertices selected on the picture form an ngon. It's not very clear on the picture, but the support beam has also been reduced to just a thin strip. Here you will have to do some manual fixing. By cutting through geometry like this, you will also have parts of the mesh that will not be visible, but still take up UV space. Note that this is only a problem if you're going to use symmetry on your UVs, as you're then taking UV information from a modifier applied before the symmetry modifier, but if you're using unique UVs you apply the unwrap modifer above the symmetry modifier, effectively fixing the problem.

While the symmetry modifier is applied, I fix the problems, welding verts to remove ngons, and brush up the visual problems, like the support beam becoming too thin in this example.
The next step is to look at the mesh in an ortographic view, from a 45 degree view, and delete every polygon on one side to ensure that every vertex is properly aligned to the plane of the symmetry modifier we used earlier. I then fix up the problems we were having, fixing Ngons and brushing up the problems like the support beam becoming too thin. The final step is to reapply a new symmetry modifier with the same properties as before.


In the next picture I've fixed the smoothing groups on the right side of the mesh. When using symmetry, you also transfer the smoothing groups, resulting in weird results in the seam.
If you want to use a symmetried texture, you can now apply an unwrap below the symmetry modifier, and it should work fine.
The final result with textures
If you want parts of the mesh to be damaged, there are some things you should remember. Even when using unique UVs it's a good idea to first use symmetry on your UVs to make sure they are of the same dimensions  on both side and thus saving you some work. If you're using special assigned places in your UVmap for different textures, remember to save some space for broken stuff, like debris, rock, wood, isolation or whatever material that might be exposed by damage.  
You can also get away with using symmetry on your UVs, even if the parts are not perfectly symmetrical. Working above the symmetry modifier, you should be able to detract parts of your mesh without breaking the UVs. This might not always work, and most of the time you will probably find that it's best to use unique UVs for parts like this. 


As I'm writing this I'm sitting at the global game jam, and will have to wrap this up for now! I'll try and get these posts out more frequently, but it's all dependent on the work load from week to week. 

Game of the moment: Civilization 5 !

Happy gaming!

-Svein


Sunday, January 6, 2013

Modular assets

The tutorials I write in this blog may seem obvious for the professional 3D-artist, and they're more aimed towards people who have recently started, or want to start with, game design.

In today's post I want to talk about modular assets for games. Modular basically means pieces of a bigger set that can fit together, and be reused multiple times to build a greater scene. When we started working on  Among the Sleep, we were all still students and had never done any (real) work on a game before. What we did in the start was to build levels as one mesh, and export it as one whole block. This created problems when we further down the road realized we had to rethink some of the level design, and had to redo the mesh. Some ugly work were done where we detached whole parts and slapped them on elsewhere and had some unpretty stitching to place it elsewhere. The whole mesh then had to be unwrapped all over, as this process can't be done without destroying some parts of your mesh. It will also create some issues with culling, but that's a whole other subject which I won't delve into today.

So after a while we decided to do some research on modular assets, and it has helped us a lot! Now we just create a number of pieces consisting of walls, doors, floors and ceilings and place them around like a construction set. This makes it that much easier to rebuild your level, and also helps keep your scene tidy, as everything is on a grid. There are a number of good tutorials on how to do modular assets, so I won't go in too much depth on how to do this, but I'll try to write about some of the tips and tricks we've learned on the way.

I'll start with some of the stuff you need to have down before you start, to avoid problems further down the road. I'll also show most examples in 3Dstudio Max, as it is the 3D-modelling software I use, though most of what I show is transferrable to other modelling softwares.

"Pivot! Grid! Units! UV tiling!"

When planning this post, I asked our Art Director if there were any points he wanted me to include. The answer was short and consice: "Pivot! Grid! Units! UV tiling!". So I figured I'd start with that.

Pivot!

Pivot placed in the lower corner of a very basic wall module
When making modular assets it is very important to be pinpoint precise. If you make pieces that kinda fit together, but not quite, you will get ugly seams or z-fighting in your level. The first thing to think about is your pivot point. We usually place the pivot on a modular piece in the lower corner. When having the pivot point in the lower corner it is easier for the level designer to place them together precisely. You could of course have your pivot in the dead center also, and it would work, but it is just easier to place things precisely when you can zoom in to the point you need to snap to, while at the same time being able to move your asset.


Snap settings, snapping two verts and grid point
What I found makes my work a lot easier in 3Dstudio is the "Snap to Vertex"-function. Using this I can easily snap my modules to the outermost vertex of another mesh, aligning them perfectly.

 Below I've very crudely demonstrated how you can align two wall modules using the snap to vertex-function.


2 unaligned wall modules

Snapping the pivot of one module
to the outermost vertex of another module,
creating a perfect alignment

Grid! Units!

The grid is the squares with which you measure distance. When snapping to the grid it makes it easier to do precise modelling and moving objects around. It's important to set up the grid in your 3D-modelling software the same way it is set up in your game engine. Let's use UDK as an example, where in the editor you generally follow a rule of 2. Assets are almost always dividable by 2, like 64x64 or 64x128 or 256x256 and so on. So you'd want to have a grid in your modelling software that's also dividable by 2. 

Setting up the grid. In my case I like to have a grid of 2,5 cm, and major grid lines every 10 lines
These can be changed based on personal preference, as long as they follow the same type of grid as you  use in your editor, e.g. don't use 2,5 as a grid in your modelling software if your grid in the editor is based on the rule of 2. 
At Krillbite we use the metric system, and then it's important to also remember to use the correct units in your modelling software. We've had some ugly cases where I forgot to change my units, and my 200 cm tall wall turned out to be 200 inches tall instead. Whoops! 
Setting up my units correctly. 

UV Tiling!

A very important aspect of modular assets is making sure you're unable to see where one module starts and another one ends. To achieve this it's important that your textures tile up. If you're not covering up every single transition between modules with other meshes, you need a tileable texture. You also need to make sure the UVs tile between modules. I'll give an example:

Here we have to very basic wall modules together. Their UVs tile up, so without the black line you would be unable to tell where the transition is. 
In this example it is easy to achieve a good result, since the walls are perfectly square, and it's thus easy to fit their UVs. However, you seldom use modules that are just square planes. In this example there is simply no room for any other part of the mesh in the UV space.


When using modules with several other parts that also needs to fit inside the UV space, you can either use two materials for the mesh. Alternatively you can assign a specific space for the part that needs to tile, and draw your tilable texture to this space. 


When using assigned space it is a good idea to select your vertices and write in their coordination value in the boxes below, as shown to the left. This way you can get them to a precise position, instead of "approximately in the middle-ish". This way, if we're talking about a 2048x2048 texture, the 2D-artist can know that the assigned space is -exactly- 1024x1024 pixels large.


In my next post I'll write more about specific modelling techniques I've picked up when working on modular assets.

Games of the moment: Planetside 2 and Chivalry!

Happy gaming!

-Svein