I wrote in one of my earlier posts that I'd try to post more often. Well, that failed! We've worked hard towards having something to show off at the upcoming Game Develeopers Conference, so there's been less time to write. In addition to taking up my time though, it's also forced me to work a lot and I picked up a handy tip when baking ambient occlusion maps. For those unfamiliar with the term, the article at http://www.laurenscorijn.com/articles/ambient-occlusion-baking explains everything there is to know.
I've read his article a couple of times to figure out the easiest way to bake ambient occlusion maps, but for some reason I skipped the part on overlapped rendering, which is quite important! I've been making a lot of bookshelves and cupboards with drawers lately, and in those occasions you have models with so many similar parts that you want to save UV space by copying the parts over one another. Let's look at this very basic nightstand as an example:
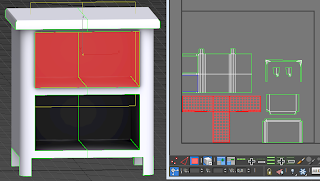
As seen on the picture to the left, I've overlapped the drawers, red, and the insides of the drawerslots on the nightstand, blue. I've also added the ambient occlusion bake I did from this to the texture. At first sight it looks okay, but if we look closer...
It's kind of hard to tell from this picture, but you can just make out some weird lighting at the innermost bottom part. (The black shadows are actually not the Ambient Occlusion's fault, just funky 3D studio shading).
Inside the drawers you can see the lighting artifacts much clearer. The edges get a weird effect from receiving duplicate light information.
To fix the problem I select the overlapping UVs and toggle the button in the lower left corner of the UV Editor window. This allows you to type relative values in the move fields. (If you try to move the UVs in absolute position mode, you will just squish all the verts into the same position in the axis you moved them in.) I then move the UVs 1 unit in either direction. It doesn't matter what direction you move it, as UVs tile in every direction.
This is how my UVWmap looks after moving the overlapping UVs. You can see that all overlapping UVs now have the same position + 1 unit. This will make them be ignored in the baking process, as they lay outside 0-1 space, but for texturing purposes it would be like they still share UV space.
Here's one of the drawers after the new bake, and you can see that this fixed the problem. Note that I used symmetry for this mesh, and it will work fine when baking, just remember to apply your symmetry before baking, as else light will bleed in from the gaping hole down the middle of your mesh. It's also important to have sufficient padding when using symmetry, to avoid lighting errors where the symmetry is applied.
Hope this helps out, and don't be afraid to ask questions if anything is unclear!
Games of the moment: Sim City and Heart of the Swarm!
Happy gaming!
-Svein


No comments:
Post a Comment